Showing posts with label QAL. Show all posts

Friday, June 13, 2014

Final Medallion Border: Test Blocks

My medallion top has been hanging on my design wall for weeks and weeks, waiting for inspiration to strike.  What block will I make for my final border?  I wanted it to be 6.5 x 6.5 inches and pieced without templates.  As every other part of the quilt has been paper pieced, I'm getting a little tired of that and have been wanting to just sit and sew.  


As the rest of the quilt is very angular, I thought a basic square/rectangle block might be a nice change.  After a quick vote on Instagram (@fluffysheepquilting) it was decided that I'd start making super scrappy blocks on a LV background.  I went to town and made 8 tester blocks.


But then when I placed them side by side on the design wall, the design didn't pop against the LV prints.  Out came the seam ripper....


And instead I made matchy scrappy blocks on a LV background.  Now these you could see easily. 


Although the rest of the quilt is hog wild scrappy, I sort of like the grouped, color-coordinated scraps in these final little blocks.


I think the coordinated scrappiness jives relatively well next to the crazy scrappiness of the rest of the quilt.You can easily see the block pattern against the background, too.


The one thing I'm not sure about is that there's no secondary pattern between the blocks in the outer border.  They seem quite jarring against one another.  I tried making mirror image blocks and inserted them in between, but that's even worse.


Suggestions are welcome, but for now I'll just keep piecing these little cuties until (again) inspirations strikes and I find a better way to unify the blocks in the outer border.  I have two pretty good sized piles of scraps cut ready for chain piecing, so it's perfectly mindless and rewarding just sitting and piecing a few blocks as I walk by my sewing room.  Happy days.


Monday, March 17, 2014

I. Am. In. Love.

Can you say that about your own quilt?  I am not sure it is socially acceptable.  I should say I am "quite pleased" or something, but this quilt top makes my heart sing.


It was a bit of heart ache this weekend, but working through my "issues" was really quite satisfying.  

When you saw this quilt top last, the center block was not the right size. It had to be trimmed down and the navy border added before adding on the square in a square border.  That was easy enough to do.  The square in a square strips fit PERFECTLY.  Glorious.


I then added on the green border of FMF Eyelets.  My other half suggested I go with a green for this border and I think he was right!  I was going to go yellow, but I think I will save that for the binding.  This border used every. last. piece. of Eyelet in my stash.  It's bitter sweet.


I went on to create my own paper piecing template (using this tute) and stitched a scrappy LV triangle border alternating with saturated "monochromatic" scraps.  I was pleased as punch....until I realized I mis-measured and my border was 1 1/2 inches too long for the green border!!!  Oh, the frustration.  On went another scrappy rectangular border and the triangles fit perfectly.  My size issues are sorted for now, but the next border is going to be pretty tricky size-wise.

Another three sides of triangles to go and then four corner stones to finish off this 'round of borders.  I can not wait to get stitching again!

Happy Saint Patrick's day everyone!  Enjoy it.  xx

Wednesday, February 19, 2014

Medallion Square in a Square Border

I have already lost count of what border I am stitching.  Given the center block is on point, does that make the LV setting triangles a border?  And how will I fix my scrappy rectangular border after the LV triangles?  Maybe with another border....

In the end, who cares?  I will carry on.  As you can see, I still have not properly re-adjusted my scrappy border and instead have just started to piece my next border.  I have fallen in love with these little fussy cut square in a square blocks.  These finish at 4 inches and are paper pieced.  It takes me no time to whip one up, so I am sewing little blocks when walking by the sewing room, between dinner and the dishes, etc.  Having such a nice, quick, easy, rewarding block has been wonderful.


Do we like this?  Or no?  Too busy?  They can always go on the back....

And what do you think of the LV scrappy look?  I'm trying my hardest, but really stunk at it last time.  Is it working this time?

This is my first time fussy cutting fabric.  It is awfully wasteful and I am not entirely convinced it is worth it, but for these blocks its a necessity.  Want to see some of my favorites?


And, of course, a bit of Heather Ross.  These are the only two prints I have of hers.  Both are incredibly special to me as I'm a big camper and little frogs/tadpoles have a special place in my heart.  I nearly wish I made the entire border out of fussy cuts from these two prints, but it is too late now!


Is it just me, or do those little birds look hungry?!?!
I will keep stitching.  I generally do not have fabric in my stash that is prone to fussy cutting, so I am going to reach a wall pretty quickly.  I am determined to not buy additional fabric for this quilt, so I will have to dig deep!


Monday, February 17, 2014

Medallion Center Block

Have you signed up for the Fluffy Sheep Quilting charm Pick-A-Pack Crew? 
It's easy peasy - just hop over here and leave a photo of your favorite fabric in the linky party!

It is with great happiness that I show you the finished center block for my medallion quilt!  I did struggle a bit putting together the eight slices of the block, but in the end I'm reasonably pleased with how those seams came together.  With 88 pieces in the one 12.5 inch block, I can not expect every seam to be nice and crisp.


As you may remember, I'm following the Medallion Sew Along instructions to create this quilt.  My first center block should be 15 inches (finished), so I added in an orange Half Mood Modern scissor print to bring it up to size.  I then decided to set it on point with a texty print background fabric.  So far so good!


This week our challenge was to add our first border to our (rather large) center block.  My border needed to bring the final top size to 24 inches.  I want this to be a scrappy quilt, so I brought in several all new fabrics, but tried to keep with saturated, somewhat monochormatic fabrics that "read" as a solid color.  


Now here's the rub.  I made the border 2 inches wide, thinking I'd just trim it down to the 24 inch center block that I need for this step in the QAL.  Otherwise, because I set my 15 inch block on point I had to add a weirdo border of 1.3 inches to all sides.  Yes, trimming would be easier.  The only problem is that I misinterpreted the (very clear) instructions....it's not 24 inches UNFINISHED (what I now have) but 24 inches FINISHED.  Stinker.  I will have to unpick my border, add on another two inch border and instead trim to 24.5 inches.  I'm a bit mad at myself, but it is easy enough to fix...unless one of you has a great idea that doesn't involve a seam ripper?  I'm open to suggestions!  

No matter what solution I/we come up with to get this block up to 24.5 inches, I'm quite pleased with how its coming along.  I've started in on my next border.  I'm enjoying the process of making it, but I'm not sure it really "sings" with what I have so far.  I will show you more later this week and you can tell me what you think :)

Wednesday, February 12, 2014

It's Worth the Effort

I love foundation paper piecing.  I know it drives some of you mental, but for me there is nothing better.  It gives me an excuse to pull out my crayons.  The template tells you where to stitch, so you don't have to pay attention to that quarter inch seam, AND you get the pointiest of points in your final block.  Win win win.

Over the weekend I pulled out my trusty star templates and started stitching.  Much to my surprise they came together WAY easier than I thought they would.  Only once did I really really mess it up, but that was my own fault for sewing while tired.


I was very lucky to not run out of my chosen fabrics. I had forgotten how much wastage there is when paper piecing and I really wanted to have some left over to pull these colors/prints through to the borders.  I came quite close to the end of my red pin fabric, but squeezed out every last drop from the FQ I had.  Whew!


I have all 8 sections pieced now and I'm trying to put them together in quarters, halves and then into the final block.  Now here my system of simple sewing on the line is breaking down.  I am not getting the lovely matching seams and pointy points that I would like to have.  I think it's because I can not quite feel the seams to align them with the two pieces of paper on either side.  The four layers are also quite thick to sew through and a little slippy with the paper running along the faceplate.  I have started to rip out the paper from two of my sections to see if I have better luck stitching them together.  I will let you know how that goes.


With any luck, I will have a finished block tonight.  I have to start thinking now about borders and placement.  Will this block go on point? Or what borders will I add to bring it to 15 inches?  I'll probably mess with a few options and ask your thoughts on IG (@fluffysheepquilting) later this week.

The two quarters on the right have been joined together, so there's a bit gap
with the "used" seam allowance.

My, these look dingy in the dark evening light. They're really quite vibrant
and pretty....honest!
In other news, did you see that Rapture, by Pat Bravo, has arrived in the shop?  This line is just gorgeous and, as with all Art Gallery Fabric prints the texture of the fabric is just divine.  This was supposed to arrive at FSQ back in December, but was stuck in Korea for nearly 2 months!  I nearly cried when it finally arrived!


Wednesday, February 5, 2014

Modern Irish Medallion QAL Plans

Since the announcement of the Modern Irish Medallion QAL, I have been busily daydreaming of what fabric colorway I want to use and what my center block of the medallion will look like.  What a wonderful way to occupy my brain on the commute to and from work.

I know you are going to be shocked when I say that I want to use a star as my central block.  I searched high and low for a paper piecing template that I could download as I would like for this to be more complex than my usual 8 point stars.  There are apparently lots of really amazing paper pieced star pattern books, but I am not lucky to have one of those on hand.  Instead, I found myself browsing time and time again Wombat Quilt's free paper piecing downloads.

There, Cath had an example Kaleidoscope star block.  I was hooked.

From http://wombatquilts.com/free-paper-piecing-patterns/
I would like my central block to be more scrappy and random, though, as I want the majority of this quilt to be from my scrap bin and stash.  I pulled out my crayons and came up with a potential star design with a little help from my fuzzy buddy, Clarkson.  Does your cat immediately sit on any new-to-him piece of paper? Mine does.  Always.


I finally coaxed him off and finished my all so important coloring....


It seems a bit more "me".  This paper pieced star will finish at 12 inches square.  According to our QAL guidelines, I need to add a border to this block making it 15 inches OR turn it on point and add setting triangles.  I think I'll choose a path once I have the block in front of me.  These things tend to work themselves out.

But what fabrics will I use!?!?  How about these?


I just hope I have enough of the red pin fabric.  Fingers crossed!  You'll see a little white print with black dots on the bottom of the fabric pull.  Yes, I'm going to try once again to use an LV background.  Who knows if I can get the hang of it this time.  I will give it a try and you guys can tell me where/when I go wrong.

This week I will be piecing the central star.  Until then, I am linking up with the MQG Ireland.  If you want to see what others are planning for their medallion quilts, pop on over with me!  


Wednesday, January 22, 2014

Modern Irish Medallion Quilt Along

Note: This is a re-post of today's announcement over at the Modern Quilters of Ireland blog, but I thought I would toss it out there for anyone else who would like to stitch along.

You asked for it, you have it: announcing the Modern Quilters of Ireland quilt along!  2013 seemed to be the year of the medallion quilt, which really got my creative juices flowing.  Although there were several gorgeous patterns circulating, like the Marcelle Medallion or Made to Measure, they were not well suited to my quilting interests.  I really do not like using templates and flying geese make my heart clench.  I had to find another way to create one myself.

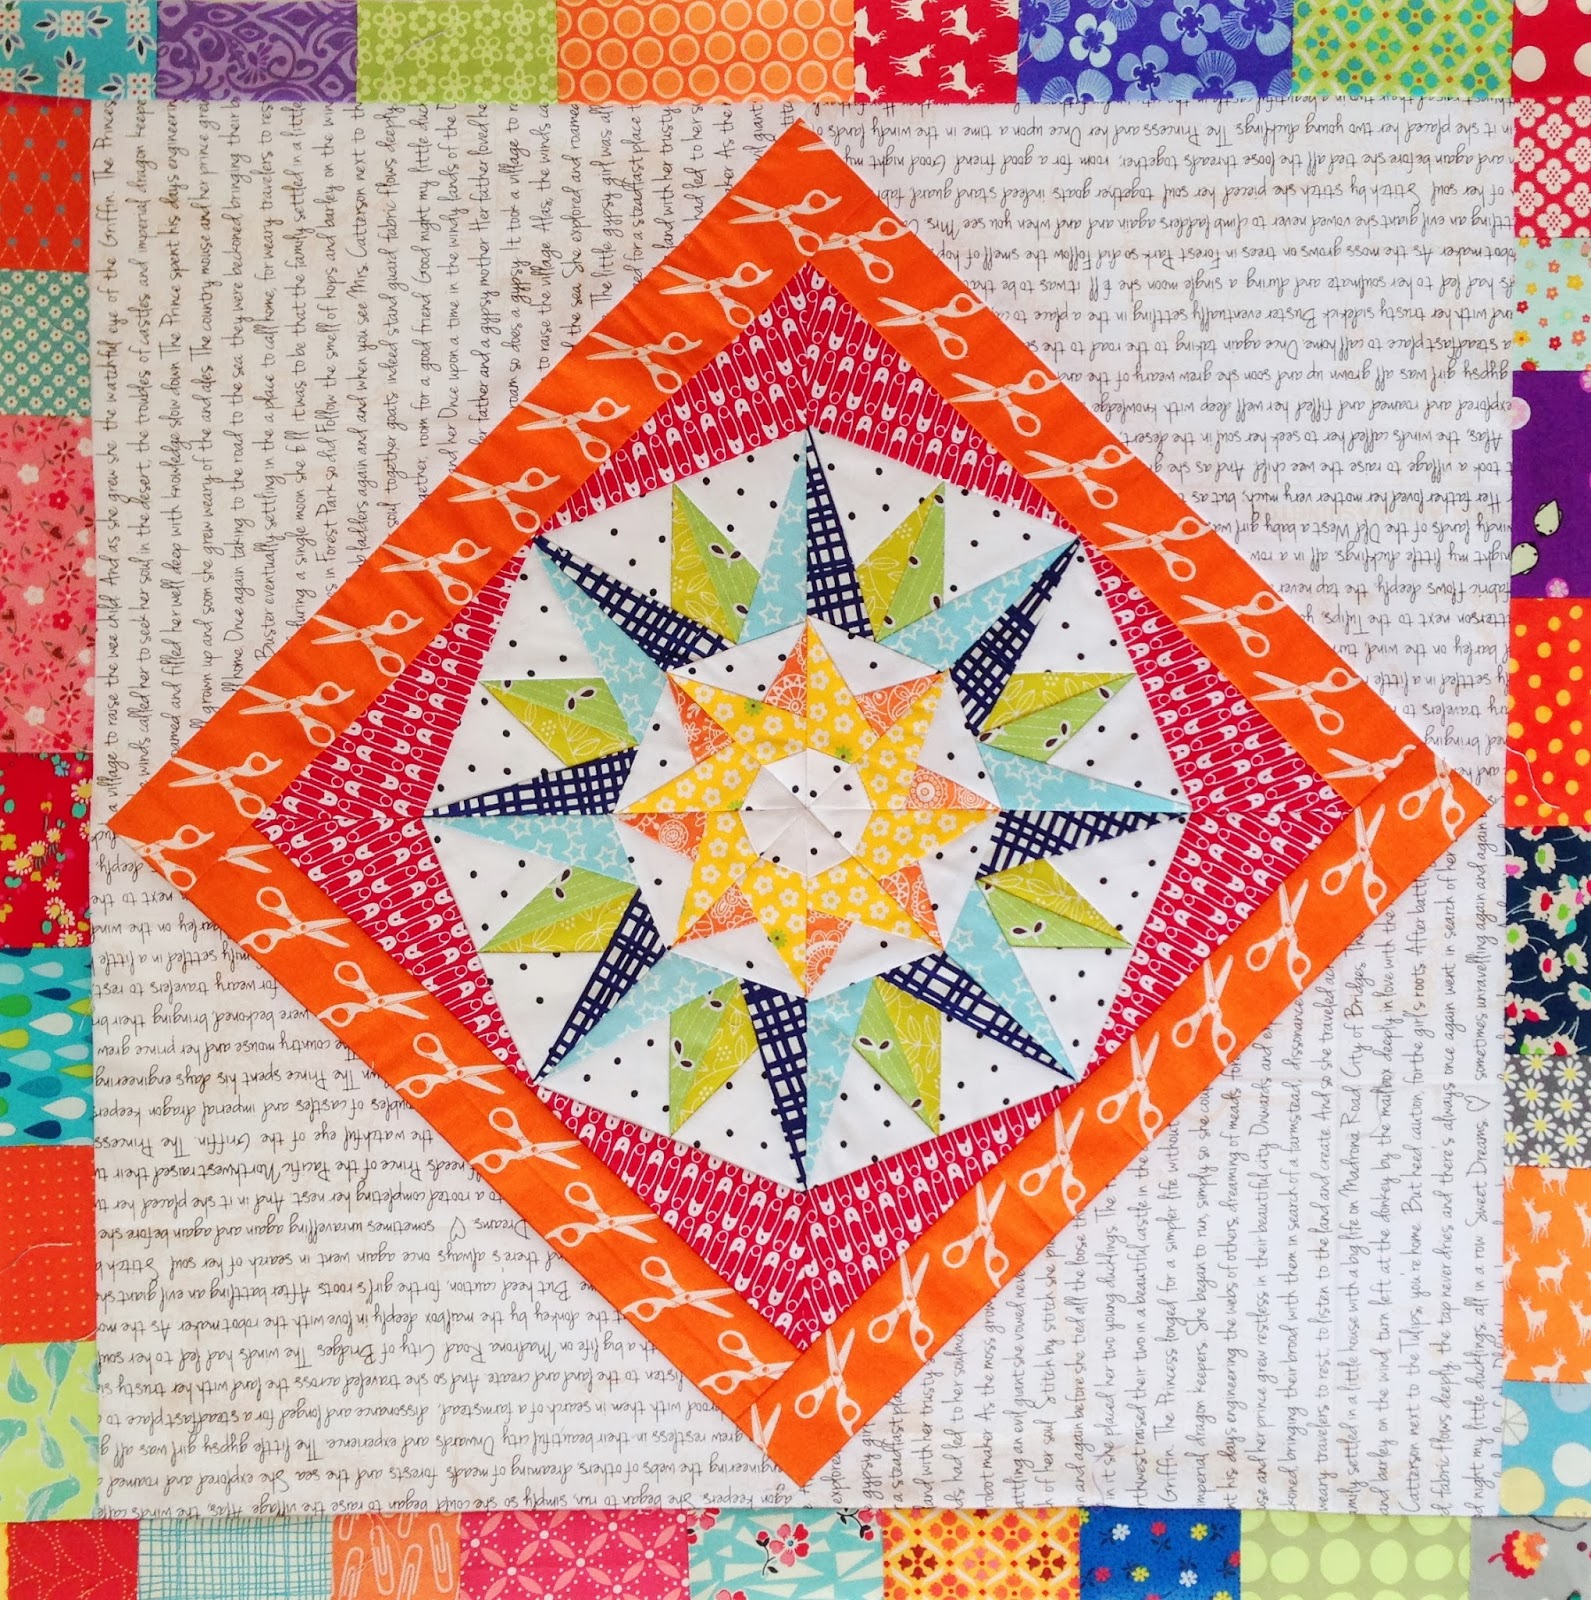
I started to do a bit of online research to find example medallion quilts that I loved, looking both at the design of the borders as well as the fabrics used.  I created a little inspirational mosaic...that I ogled time and time again when daydreaming of my own medallion quilt.  

1. Red Pepper Quilts, 2. Not available, 3. Red Pepper Quilts, 4. Not available, 5. Not available, 6. Not available, 7. Medallion Quilt detail, 8. Baisakhi Medallion Quilt, 9. 1930s Medallion Quilt

I've been looking long enough.  It's time to stitch!  What if we, as a guild, could create medallion quilts together.  Are you interested in stitching along with me?  I found a wonderful series of tutorials by Catbird Quilts that we can use together.  These tutorials are set up so that we can each create our own individual medallion quilt (depending on our skill level) using Catbird Quilts tutorials on the design-as-you-go process.  Melanie (the brains behind Catbird Quilts) gives two paths to follow in each tutorial.  One path (for beginners) will give block/border measurements for the center square and then for each border.  Alternatively, you can take path two (more advanced) and design your own quilt using Melanie's suggestions on size ratios, etc.  Melanie explains it much better here, so please do click over and read her first post

++++++++++++++++++++++++++++++++++++++++++++++++++++++++++++++++++++++++
Here's how this will go:  

First, read this post to get the basic idea of this QAL.  I know this is something that each and every (interested) member of our guild can do to their own skill level AND we can have a great time stitching together, drawing inspiration from one another and learning as a collective group.

Second, search through your fabric stash (or go shopping...what ever makes you happy) and find a palate for this quilt that makes your heart flutter.  Scrappy is most likely best as we don't exactly know how much fabric we will each need.

Third, if you have not already done so, join our Flickr group so that we can all keep updated on each other's makes.

Finally, come back here in two week's time for a linky party.  By 5 February you should have A) a gorgeous fabric pull to share with everyone and B) an inspirational mosaic for your first central block of your quilt.  If you've started stitching, that's even better.  Show us what you've made in your own blog post and leave us a link to check it out!

We will then take each additional border as it comes with shorter intervals between linkies for the first, smaller borders and then giving ourselves more time for the larger outer borders.

++++++++++++++++++++++++++++++++++++++++++++++++++++++++++++++++++++++++

If you're into books, I picked up a few inspirational books including border patterns that could be adjusted depending on the project.  Liberated Medallion Quilts  by Gwen Marston is quite inspirational with a WIDE variety of eye candy quilts to keep me interested each step along the way. 


And then Gwen's co-authored book with Freddy Moran, Collaborative Quilting, hit the mark with lots and lots of border ideas that can be scaled depending on the project.  Super!  You can read my Collaborative Quilting book review here if you'd like.


Now let's get stitching!


Tuesday, September 10, 2013

Swoon Blocks 6 and 7

I am still Swooning along.  Honestly!  These blocks, and this quilt, still hold my interest, but each block is a commitment so I am slow to turn them out.  I have just finished blocks 6 and 7.  Want to see them?


I really like the grey eyelets in this block.  They set off the business of the green print so that the overall effect doesn't induce seizures.  I'm digging the green and grey color combo too.  That's a new one for me.


I'm a little flustered with this one.  I had originally planned this block so that the pink was the center star print and the grey they surround, but I cut them in reverse order.  This means I'll have more grey stars in the quilt than I originally intended.  That being said, the pink dots may have been too busy for the central star.  Regardless, this block still looks nice with the others on my design wall.

Two more blocks to go!  I should have them finished this week all going well.  Woo hoo!

Wednesday, August 21, 2013

Swoon Block 5

Just a short post today to say hello and show you the Swoon block I finished today.  Here she is, Block 5 in all of her DS glory.


I think this is my favorite block this far. I just love that gold bouquet fabric and nearly anything made with it.  I think I have now caught up with the QAL, but I will keep pushing through and will try to finish before our QAL deadline.  Another two blocks to come this weekend.  Woo hoo!

Monday, August 19, 2013

Swoon Blocks 2, 3 and 4

I think I have officially caught Swoon-mania.  After getting the hang of it with block 1, I very much enjoying piecing these blocks two at a time.  This weekend I finished off three additional blocks and have a fourth nearly completed.  I think the fourth may be my favorite yet, but until it's finished I'm only revealing blocks 2, 3 and 4.


Block 2 in blues and greens.  I love this block and it gave me hope after crazy block 1 that this quilt will be OK. The blues and greens are just so lovely together and the pattern of one doesn't overwhelm the other.


Block 3 introduces grey with the pink.  I like how the grey cools down the other blocks. It looks so beautiful on the design wall.


Block 4 is another blue and green combo.  This doesn't look as washed out in real life.  The blue is really beautiful and lively.


I'll leave you with a photo of Molly.  You haven't seen her in quite some time and she's growing like a weed. She is 6 months old now and over 50 pounds (23kg).  She brings such life to our home I can't remember what it was like before she joined our family.


Tuesday, August 13, 2013

Swoon Along Block 1

As you know, I joined in the Swoon Along a few weeks back.  I didn't have much to show you as I have only been diligently cutting my DS FQs and Kona background fabric.  But finally things are starting to take shape!

I am trying to use two contrasting colors in each star, but what I am quickly realizing is that for the pattern to really pop I need two contrasting prints that really read as two contrasting colors.  I started with these two prints:


and made this star.  


Now I do like it and I will use it in the quilt, but I wish it has more definition and wasn't so busy.  I think it's the pink dotty print (one of my favorite DS prints!) that is making it so hard for my eyes to adjust.  I am starting to wish I had planned to incorporate more solids...but it's too late for that seeing as all of my FQs are already cut up!  Anyway, no regrets.  I am learning and moving ahead.

Block 2 and 3 are currently being pieced.  They're both blue and green blocks but I think they're less busy because the green print reads more as a solid.  Fingers crossed, anyway!


Lessons learned so far?  
1. Cut 4 inch pieces from each FQ instead of the 3 7/8 inch pieces in the pattern.  It enables you to square the pieces as you go.  If you're like me and pre-cut your 3 7/8 inch pieces, just sew a little to the center of the diagonal line you drew (do a small 1/4 inch seam) and you will be in great shape.
2. Incorporate solids - or dominating prints that read as a solid.
3. Lay two FQs on top of one another to cut them faster. That worked a treat and sliced my cutting time in half.
4. Once you get your brain around one block, try piecing 2 at the same time.  It doesn't take much longer than doing one if you chain piece.

Some ladies in the QAL Flickr group are already finished their tops! Some have great alternative uses of the pattern and some are expanding the 9 star to 20 star massive quilts. Do pop over to the group for a bit of fabric inspiration.  It's amazing what folks are creating.  I had better get focused fast and start piecing like mad just to keep up!

Tuesday, June 25, 2013

Swoon Love

I have been obsessed with Swoon blocks for quite a while now.  I think they are so beautiful and I love the variety of different ways you can mix fabrics, making them so very striking.  That being said, I knew at times folks struggled to complete a Swoon quilt.  So I kind of ignored my urge to jump on Swoon-a-long 2012.  Who needs another UFO?

FairyFace Designs

But when Sarah announced the Swoon 2013 QAL I couldn't resist any longer.  I'm in.  Hook line and sinker.     If anyone can keep me right on track, its Miss Sarah.  She has my mobile phone number for the love of god!  Anyway, I ran off immediately and downloaded my Swoon pattern from the Fat Quarter Shop.


And I signed the shop up to be a sponsor (details on Sarah's page) just to give myself a little bit more of a push.  No messing now!  

I had a little look around my stash for the 18 FQs I need for this pattern.  I found 12 that rang my bell.  They were the 12 special DS prints that I have had sitting on a high high shelf for over a year now.  I think they'll make a pretty swoon quilt. 


I quickly added on another 4 grey prints as well as 2 golds (in the post right now!) to round out 18 I need.  


I even thought ahead enough to pick this up for binding.  Since these prints are so old, they are on sale in nearly every shop.  Bonus!


I am ready to roll, then.  Week 1 of the Swoon 2013 QAL and I am on track.  I'm hoping to make a few blocks while I wait for the grey/gold prints in the post.  Can't wait to get to cutting now!


Related Posts Plugin for WordPress, Blogger...

Label Cloud

241 tote all heart appeal antique applique apron art quilt aurifil award baby quilt back background bag basket batik bee Bee Blessed Big Stitch Swap bird's nest birdie stitches birthday blankets of love block blog blogaversary blogger bundle bloglovin' BOM book brit bee brooch bundle bunting business card holder camping cathedral window chain piecing chaos charm pack charm squares charm swap chickens Christmas class clothes color commission community community quilt contest craft craft fair cross cross stitch Cúchulainn cushion design wall diaper Do.Good Stitches donation double wedding ring drawing dress eclipse election electronica embroicery embroidery eraser stamp exhibit fab fabric fabric tape facebook FAL farmers journal fat eight fat quarter fat quarterly feature festival of quilts film finish finish along flag flickr flying geese FMQ FNSI frame Free Motion Friday free motion quilting friends fugly Galway Galway Now gift giveaway goal goals goodie goodie swap granny mania granny squares graph guest blog guild hand puppet hand quilting hand sewing happy hat help hexagons hey girl hospital hot pad HST I Spy ICA improv innovation award inspiration interview invitation ipad ipad cover IPS IQFOI Irish chain Japanese key fob kind stitches knit knitting knitting and stitching kona lattice illusions laugh launch learning lecture Liberty linky list little star loops love on the blocks LQS Day magazine market medallion mennonite miniquilt mixer cover mod logs Mod Pop QAL modern blocks Modern Irish Bee modern irish quilters modern quilt guild modern quilt guild bee modern stitching Modern Stitching Bee monster mouthy stitches mug rug mural name name game name tag napkin needle book new york beauty newsletter Nieve notebook cover overlocker panel paper piecing patchwork pattern Pay it forward Peace Valley peanut butter perle cotton pezzy pizazz photograph PIF pillow pillowcase dress pin cushion pinwheel PJ placemat podcast polka dot pom pom portholes post pouch precut puffy pouch puppy purse QAL quilt quilt exhibit quilt frame quilt top quilter in the gap quilting Rainbow Charm Swap research retreat retroflower review sale sampler scarf science scrap scraps screen printing seams selvage sew and bee happy Sew Bee Blissful sewing machine sewing room shop significant sizzix sketch skirt solid spools stall stand star stargazing start your own stitched in color string stuffed super tote surprise swap swoon tablerunner teaching text thumb tack tiles top tote toy travel tree skirt tumbler tutorial twinkle twinkle twitter video vote walk wallet website win WIP wonky house yarn youtube zip

Total Number of Page Views